

Creating and validating ACM certificates with Terraform
Table of Contents
This post is part of a series about hosting a static website, specifically a Hugo-based blog hosted in AWS but this process is useful anytime we need to create a SSL certificate in Amazon Certificate Manager (ACM).
Prerequisites
This article assumes you have the following
- An AWS Account
- Terraform installed
- A basic understanding of how to configure Terraform to access your AWS account, and how to plan and apply with Terraform.
Overview
SSL certificates are generally seen as a requirement to ensure your users’ data is protected, and to demonstrate that you are trustworthy. Indeed some browsers will warn you if you try to access a site without a certificate or if you try to use self-signed certificates. However, traditionally SSL certificates have been an extra expense. Over the last decade or so, there have been several approaches to reduce this cost, from rolling your own with openssl, lets-encrypt, but in 2016, AWS announced the introduction of the AWS Certificate Manager (ACM). These certificates are free, and as long as you maintain the DNS setup described in this post, will be automatically renewed annually.
Given that maintaining trust is a function of SSL certificates, verifying that the certificate belongs to the site using it is important. ACM can verify ownership of the domain associated with the certificate either via DNS or via email (although the latter is not recommended.) To do this, it will look for a specific record in the DNS configuration for the appropriate domain - in the case of this blog, headforthe.cloud.
Using Terraform we can create an ACM certificate using the aws_acm_certificate Terraform resource, and then ensure it has been validated with the aws_acm_certification_validation resource. However, the complexity of putting the record needed for the validation depends on how we are managing our domain steps. There are 3 likely scenarios and we’ll look at how we’ll use certificate verification via Terraform, in order of increasing difficulty.
Whilst technically we can create the certificate in any region, if we want to use this certificate with CloudFront we need to create it in the us-east-1 region.
Before we look at the scenarios, we need to quickly outline how DNS works so that we can understand how ACM will retrieve details of our domains when trying to validate the certificate.
It’s always DNS
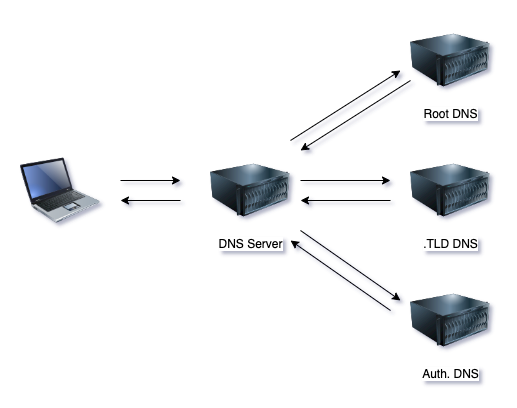
DNS, or more properly Domain Name Services, are used to translate human-readable domain names such as headforthe.cloud to the IP addresses that technology uses to communicate.
If we ask DNS to tell us how to communicate with a domain, we will talk to a nominated DNS server. This server, will in turn reach out to the top-level or root servers to find out who controls DNS for the .TLD domain (in our case, that’s .cloud). Next, the DNS server will reach out to the .TLD DNS server, asking which DNS server controls the specific domain - headforthe. . Finally, our DNS will reach out to the authoritative DNS server (sometimes known as the nameserver).
Validating ACM in DNS - 3 Scenarios
Depending on how we manage our domain and DNS, we need to take slightly different approaches to validate our ACM certificate.
1. Registering domain through AWS.
The simplest option is to register your domain with AWS. When you do this, AWS will also set up a hosted zone in Route53, their DNS service and tell the .TLD DNS to use that zone for DNS resolution for the domain. This saves you from having to configure anything around DNS hosting, other than adding DNS records.
When registering a domain with AWS, the cost depends on the top-level domain (.TLD) chosen. At the time this post was published, the cheapest domain was .click at $31 per year, but current pricing can be checked here. Once registered, AWS will automatically create an associated hosted zone in Route53. This hosted zone will attract a charge of $0.501 per month.
To create and validate the ACM certificate with Terraform, we’ll first set up a provider and store the state file in S3
 1provider "aws" {
 2  region = "eu-west-1" # <---- replace with desired deployment region
 3}
 4
 5provider "aws" { # This is  because we're going to deploy our ACM to us-east-1 so we can later use with CloudFront
 6  alias  = "us-east-1"
 7  region = "us-east-1"
 8}
 9
10Terraform {
11  backend "s3" {
12    # Replace the values below with your own specific details.
13    region         = "eu-west-1"
14    bucket         = "_insert_bucket_name_"
15    key            = "domain-r53-acm.tfstate"
16    dynamodb_table = "_insert_dynamodb_lock_table_name_"
17    encrypt        = true
18  }
19}Now that Terraform knows where to store its state, we’ll need to retrieve the details of the hosted zone. We can do this with
1variable "domain_name" {
2  type    = string
3  default = "headforthe.cloud"     # <--- replace this with your domain name
4}
5
6data "aws_route53_zone" "domain" {
7  name = var.domain_name
8}
Once we have the details for the hosted zone, we can create a certificate in ACM with the following
1resource "aws_acm_certificate" "site_cert" {
2  provider          = aws.us-east-1
3  domain_name       = var.domain_name
4  validation_method = "DNS"
5  lifecycle {
6    create_before_destroy = true
7  }
8}
The above code segment will create a certificate but before it can be used, it will need validation through DNS. DNS verification works by creating a CNAME record in the DNS zone created for the domain, and we can deploy this via
1resource "aws_route53_record" "site_cert_dns" {
2  allow_overwrite = true
3  name            = tolist(aws_acm_certificate.site_cert.domain_validation_options)[0].resource_record_name
4  records         = [tolist(aws_acm_certificate.site_cert.domain_validation_options)[0].resource_record_value]
5  type            = tolist(aws_acm_certificate.site_cert.domain_validation_options)[0].resource_record_type
6  zone_id         = data.aws_route53_zone.domain.zone_id
7  ttl             = 60
8}
This will retrieve the details of the expected CNAME from the ACM certificate and use them to create an appropriate CNAME record in the domain’s hosted zone.
Finally, we need to tell ACM to validate the certificate using the above details, with the following code
1resource "aws_acm_certificate_validation" "site_cert_validation" {
2  provider                = aws.us-east-1
3  certificate_arn         = aws_acm_certificate.site_cert.arn
4  validation_record_fqdns = [aws_route53_record.site_cert_dns.fqdn]
5}
2. Registering domain elsewhere, but hosting DNS in AWS.
Rather than registering domain names with AWS, I tend to use Porkbun as they’re great value for money and have good customer support. If you’d prefer to register your domains through Porkbun or an alternate domain registrar, you can still automate the creation of the DNS records and subsequent certification along with the validation.
This time, after setting up our provider as above, we’ll need to create the Route53 hosted zone:
1variable "domain_name" {
2  type    = string
3  default = "headforthe.cloud"     # <--- replace this with your domain name
4}
5
6resource "aws_route53_zone" "domain" {
7  name = var.domain_name
8}
Once you have a hosted zone created, you can check the details and retrieve the name servers either in the AWS console
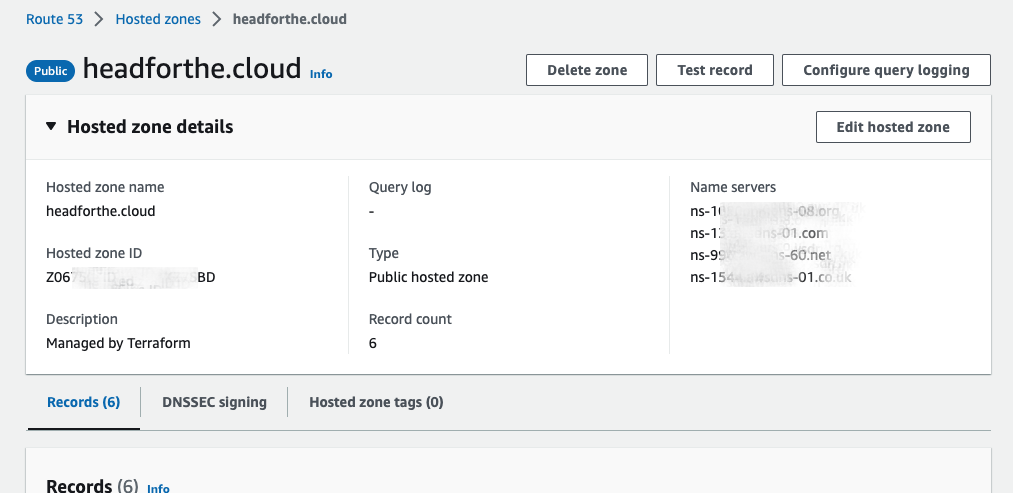
or by running the command aws route53 get-hosted-zone --id _insert_hosted_zone_id_. Once you have retrieved the name servers, update the DNS configuration in your Domain registrar and point the name servers to the values for your hosted zone.
We can then use this Terraform to create the certificate, add the validation record to the hosted zone, and finally verify the certificate
 1resource "aws_acm_certificate" "site_cert" {
 2  provider          = aws.us-east-1
 3  domain_name       = var.domain_name
 4  validation_method = "DNS"
 5  lifecycle {
 6    create_before_destroy = true
 7  }
 8}
 9
10resource "aws_route53_record" "site_cert_dns" {
11  allow_overwrite = true
12  name            = tolist(aws_acm_certificate.site_cert.domain_validation_options)[0].resource_record_name
13  records         = [tolist(aws_acm_certificate.site_cert.domain_validation_options)[0].resource_record_value]
14  type            = tolist(aws_acm_certificate.site_cert.domain_validation_options)[0].resource_record_type
15  zone_id         = aws_route53_zone.domain.zone_id
16  ttl             = 60
17}
18
19resource "aws_acm_certificate_validation" "site_cert_validation" {
20  provider                = aws.us-east-1
21  certificate_arn         = aws_acm_certificate.site_cert.arn
22  validation_record_fqdns = [aws_route53_record.site_cert_dns.fqdn]
23}
If you run all of the Terraform from this section in a single plan/apply cycle, the validation stage will wait until it can verify the details in DNS so it is safe to run, wait until you see the hosted zone created, update your DNS all in one stage.
3. Registering domain and hosting DNS elsewhere.
The final scenario is where you want to register your domain name AND manage your DNS externally.
In this case, we can still create the ACM certificate via Terraform, but we will need to set up the DNS records manually in our registrar’s DNS management. In this scenario, we will create the certificate with
 1variable "domain_name" {
 2  type    = string
 3  default = "headforthe.cloud"     # <--- replace this with your domain name
 4}
 5
 6resource "aws_acm_certificate" "site_cert" {
 7  provider          = aws.us-east-1
 8  domain_name       = var.domain_name
 9  validation_method = "DNS"
10  lifecycle {
11    create_before_destroy = true
12  }
13}
Once the certificate request has been created, we can either view the certificate in the AWS Console
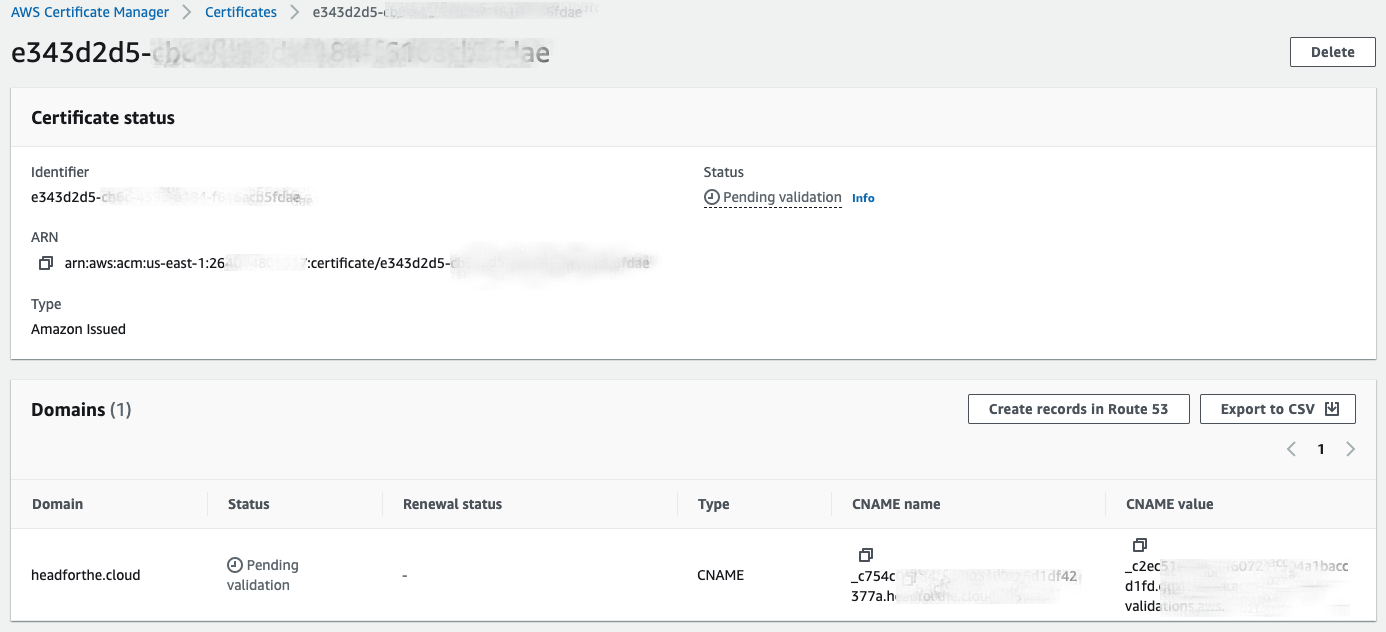
or by running aws acm describe-certificate --certificate-arn _insert_certificate_arn_ --region us-east-1 to retrieve the details to be added to your DNS. Once the details have been added to the DNS and have propagated, the certificate should verify. If the verification period expires, you can request again via the ACM certificate details in the AWS console.
Costs1
Costs for the solutions outlined in the post will vary depending on where you register your domain and which .TLD you use, and how you manage the DNS, but on the AWS side you’re provisionally looking at
- a Route53 charge of $0.501 per month for the hosted zone if managing DNS in AWS.
Conclusion
You should now understand the 3 main scenarios we might encounter when using Terraform to create and validate an AWS ACM certificate. The terraform code outlined above is available in full at https://github.com/headforthecloud/terraform-aws-acm