

Hosting a Hugo static website in AWS
Table of Contents
This post is part of a series about hosting a static website, and I’ll be talking about the infrastructure needed to host the website in AWS, and how to deploy via infrastructure as code (IaC). In this post, we’ll use Terraform to describe the infrastructure we want to deploy
Our infrastructure
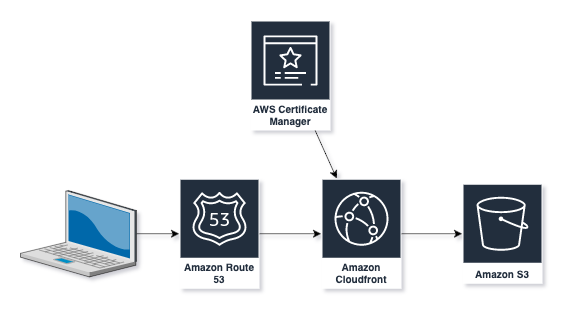
I use Hugo to run this blog - it generates static HTML pages based on files written with Markdown which means that I don’t need to worry about running servers. To host this blog, I deploy several resources into an AWS account to host this blog, as shown below:
S3 bucket.
We use an S3 bucket to store the files that contain the content for the site. AWS S3 is a very reliable, affordable object storage service. One great advantage of S3 is that it can be configured to host a website with static pages without the need for a server. Note that this doesn’t mean that we can’t provide enhanced user interactions since we can host Javascript or similar files, so we can provide a good user experience as well. When hosting a website, we create the S3 bucket with the domain name we want to use and then use DNS to route requests from the domain to the bucket.
To setup the bucket, we use the following terraform
 1variable "domain_name" {
 2  type    = string
 3  default = "headforthe.cloud"
 4}
 5
 6# Create the S3 bucket using the required domain name
 7resource "aws_s3_bucket" "blog_bucket" {
 8  bucket        = var.domain_name
 9  force_destroy = true
10}
11
12# Configure the S3 bucket for website hosting
13resource "aws_s3_bucket_website_configuration" "blog_bucket" {
14  bucket = aws_s3_bucket.blog_bucket.id
15
16  index_document {
17    suffix = "index.html"
18  }
19
20  error_document {
21    key = "404.html"
22  }
23}
24
25# The next 4 resources set the permissions on the bucket so that it's readable by all
26resource "aws_s3_bucket_acl" "blog_bucket" {
27  bucket = aws_s3_bucket.blog_bucket.id
28  acl    = "public-read"
29}
30
31resource "aws_s3_bucket_public_access_block" "blog_bucket" {
32  bucket                  = aws_s3_bucket.blog_bucket.id
33  block_public_acls       = false
34  block_public_policy     = false
35  ignore_public_acls      = false
36  restrict_public_buckets = false
37}
38
39data "aws_iam_policy_document" "blog_bucket_policy" {
40  statement {
41    sid       = "publicRead"
42    actions   = ["s3:GetObject"]
43    resources = ["${aws_s3_bucket.blog_bucket.arn}/*"]
44
45    principals {
46      type        = "AWS"
47      identifiers = [ "*" ]
48    }
49  }
50}
51
52resource "aws_s3_bucket_policy" "blog_bucket" {
53  bucket = aws_s3_bucket.blog_bucket.id
54  policy = data.aws_iam_policy_document.blog_bucket_policy.json
55}- Lines 07-10 - An S3 Bucket using the domain name defined in an earlier variable
- Lines 13-23 - An website configuration to be applied to the bucket, ensuring it is treated as a website, serving
index.htmland any errors are routed to a page called404.html - Lines 26-55 - Policies and permissions to ensure that the S3 content is readable by all.
Once created, you can check the properties of the bucket and you should see that it is now accessible via a url in the form http://_bucket_name_.s3-website._region_.amazonaws.com.
ACM Certificate
However, one downside to website hosting via S3 is that it only serves pages via an unencrypted http url as listed above, and some browsers will flag it as insecure. To work around this, we can create a certificate within Amazon Certificate Manager (ACM) and serve via CloudFront. These certificates are free, and as long as we maintain the appropriate verification details, will be automatically renewed as needed.
I posted an article on how we can create this certificate and validate it in an earlier article, but for completeness, the Terraform is posted below:
 1# First, create a Route53 hosted zone we can use for validating the certificate
 2resource "aws_route53_zone" "domain" {
 3  name = var.domain_name
 4}
 5
 6# Create a certificate, validating with DNS - note that we need to create this in the
 7# us-east-1 region since that's where we need to create our CloudFront later.
 8resource "aws_acm_certificate" "site_cert" {
 9  provider          = aws.us-east-1
10  domain_name       = var.domain_name
11  validation_method = "DNS"
12  lifecycle {
13    create_before_destroy = true
14  }
15}
16
17# Setup records in the hosted zone to allow certificate validation
18resource "aws_route53_record" "site_cert_dns" {
19  allow_overwrite = true
20  name            = tolist(aws_acm_certificate.site_cert.domain_validation_options)[0].resource_record_name
21  records         = [tolist(aws_acm_certificate.site_cert.domain_validation_options)[0].resource_record_value]
22  type            = tolist(aws_acm_certificate.site_cert.domain_validation_options)[0].resource_record_type
23  zone_id         = aws_route53_zone.domain.zone_id
24  ttl             = 60
25}
26
27# Trigger certificate validation
28resource "aws_acm_certificate_validation" "site_cert_validation" {
29  provider                = aws.us-east-1
30  certificate_arn         = aws_acm_certificate.site_cert.arn
31  validation_record_fqdns = [aws_route53_record.site_cert_dns.fqdn]
32}- Lines 02-04 - a hosted zone in Route53 for our domain. If we have registered the domain via AWS, the name servers for the domain will automatically point at this zone, otherwise we’ll need to configure DNS for our domain to point to the zone manually.
- Lines 08-15 - an SSL certificate for the domain managed by ACM. This will be validated by DNS
- Lines 18-25 - add a record to the hosted zone which will be used by ACM to validate the certificate
- Lines 28-32 - tells AWS to trigger a validation of the certificate by the detais added to the hosted zone in Route53.
Note that we’re going to use CloudFront to connect to the site via the certificate as we’ll describe below, and for this to work, we need to deploy our certificate in the us-east-1 (N. Virginia) AWS region (see this documentation for more reasons why this is). I typically run my infrastructure in either the eu-west-1 (Ireland) or eu-west-2 (London) regions which means I need to setup an alias when referencing us-east-1. I do this in my provider definition in Terraform with a setup similar to
1
2provider "aws" {
3  region = "eu-west-2"
4}
5
6provider "aws" {
7  alias  = "us-east-1"
8  region = "us-east-1"
9}
and you can see this being used when we create the ACM Certificate above.
Route 53
As mentioned above, we use a hosted zone in Route 53 to validate our certificate via DNS. As we setup the CloudFront distribution, we will also add a record into the hosted zone to direct queries for our domain to the CloudFront distribution.
CloudFront
The final component in our infrastructure is a CloudFront distribution. CloudFront is used to manage how we access the S3 website, ensuring we connect via https using our created SSL certificate via our preferred domain name, rather than the s3 website url. It also acts as a content delivery network, caching the static pages in locations geographically close to the readers.
This distribution is managed with the Terraform below:
 1
 2resource "aws_cloudfront_distribution" "blog_bucket_cf" {
 3  enabled             = true
 4  default_root_object = "index.html"
 5  aliases             = [var.domain_name, aws_s3_bucket.blog_bucket.bucket]
 6  price_class         = "PriceClass_100"
 7
 8  default_cache_behavior {
 9    allowed_methods        = ["DELETE", "GET", "HEAD", "OPTIONS", "PATCH", "POST", "PUT"]
10    cached_methods         = ["GET", "HEAD"]
11    target_origin_id       = aws_s3_bucket_website_configuration.blog_bucket.website_endpoint
12    viewer_protocol_policy = "redirect-to-https"
13    compress               = true
14
15    forwarded_values {
16      query_string = true
17
18      cookies {
19        forward = "none"
20      }
21    }
22  }
23
24  origin {
25    domain_name = aws_s3_bucket_website_configuration.blog_bucket.website_endpoint
26    origin_id   = aws_s3_bucket_website_configuration.blog_bucket.website_endpoint
27
28    custom_origin_config {
29      http_port              = 80
30      https_port             = 443
31      origin_protocol_policy = "http-only"
32      origin_ssl_protocols   = ["TLSv1.2"]
33    }
34
35  }
36
37  restrictions {
38    geo_restriction {
39      restriction_type = "none"
40    }
41  }
42
43  viewer_certificate {
44    acm_certificate_arn      = aws_acm_certificate.site_cert.arn
45    ssl_support_method       = "sni-only"
46    minimum_protocol_version = "TLSv1.2_2018"
47  }
48
49  depends_on = [ aws_acm_certificate_validation.site_cert_validation ]
50}
Some important highlights from the above
- Line 06 - This controls where our CloudFront distribution is deployed geographically. This has an impact on the costs of our distribution - the cheapest option is just to host in Europe and North America (
PRICE_CLASS_100), whereas we can have a more global distribution by usingPRICE_CLASS_ALLbut at a higher cost. - Lines 08-22 control which HTTP methods can be used to communicate with CloudFront, and which will be cached. It also ensures that all requests are routed via https.
- Lines 24-35 configure a custom origin. An origin defines where traffic will be served from and we use a custom origin to allow CloudFront to handle the URLs generated in Hugo where the page as they don’t contain an
index.html. - Lines 43-47 configures CloudFront to use the ACM certificate we created above.
Pricing1
Ultimately, the cost of hosting will be controlled by how much data is stored within the configuration. However, we can look at the separate components:
- Route 53 - this attracts a fixed cost of $0.50 per hosted zone
- ACM Certificate - permanently free
- S3 Bucket - costs will depend on the amount of data stored in the bucket. For the first year, you’ll get 5GB and once that is passed or if there is additional data, this will be charged at about $0.023 per GB per month
- CloudFront - this includes a free tier of upto 1TB data transfer per month and 10,000,000 HTTP or HTTPS requests per month.
Conclusion
Once these components are deployed, we have a low-cost, highly reliable website hosting our content. We can then deploy our content either manually or via a ci-cd pipeline as changes are made to the site.
Posts in the series
-
All prices are correct at the time of posting, but please check current pricing before any purchases. ↩︎