

Deploying a Hugo Blog with Amazon CodeCatalyst
Table of Contents
CI/CD pipelines are an integral part of any developer’s toolset these days. They monitor code and when changes occur, automatically carry out a pre-defined set of actions, typically creating a build environment, and maybe running some tests before deploying the code.
Several tools can host these pipelines, and an important part of the work I do with GlobalLogic UK&I is being able to advise clients on which solutions might be best suited to their needs, and how to implement them.
This post is part of a series about hosting a static website, and in this case, we’ll talk about how we can use Amazon CodeCatalyst to deploy a Hugo site via a CI/CD pipeline. A recent post talks about how you can host a Hugo website in AWS.
Prerequisites
This article isn’t going to talk about setting up CodeCatalyst projects, adding code etc. but I’ll cover this in a future article.
This article assumes you are hosting your Hugo site in AWS and have the following
- An AWS Account which is associated with the CodeCatalyst space
- A CodeCatalyst deployment role in the AWS account
- A Hugo website
What is CodeCatalyst
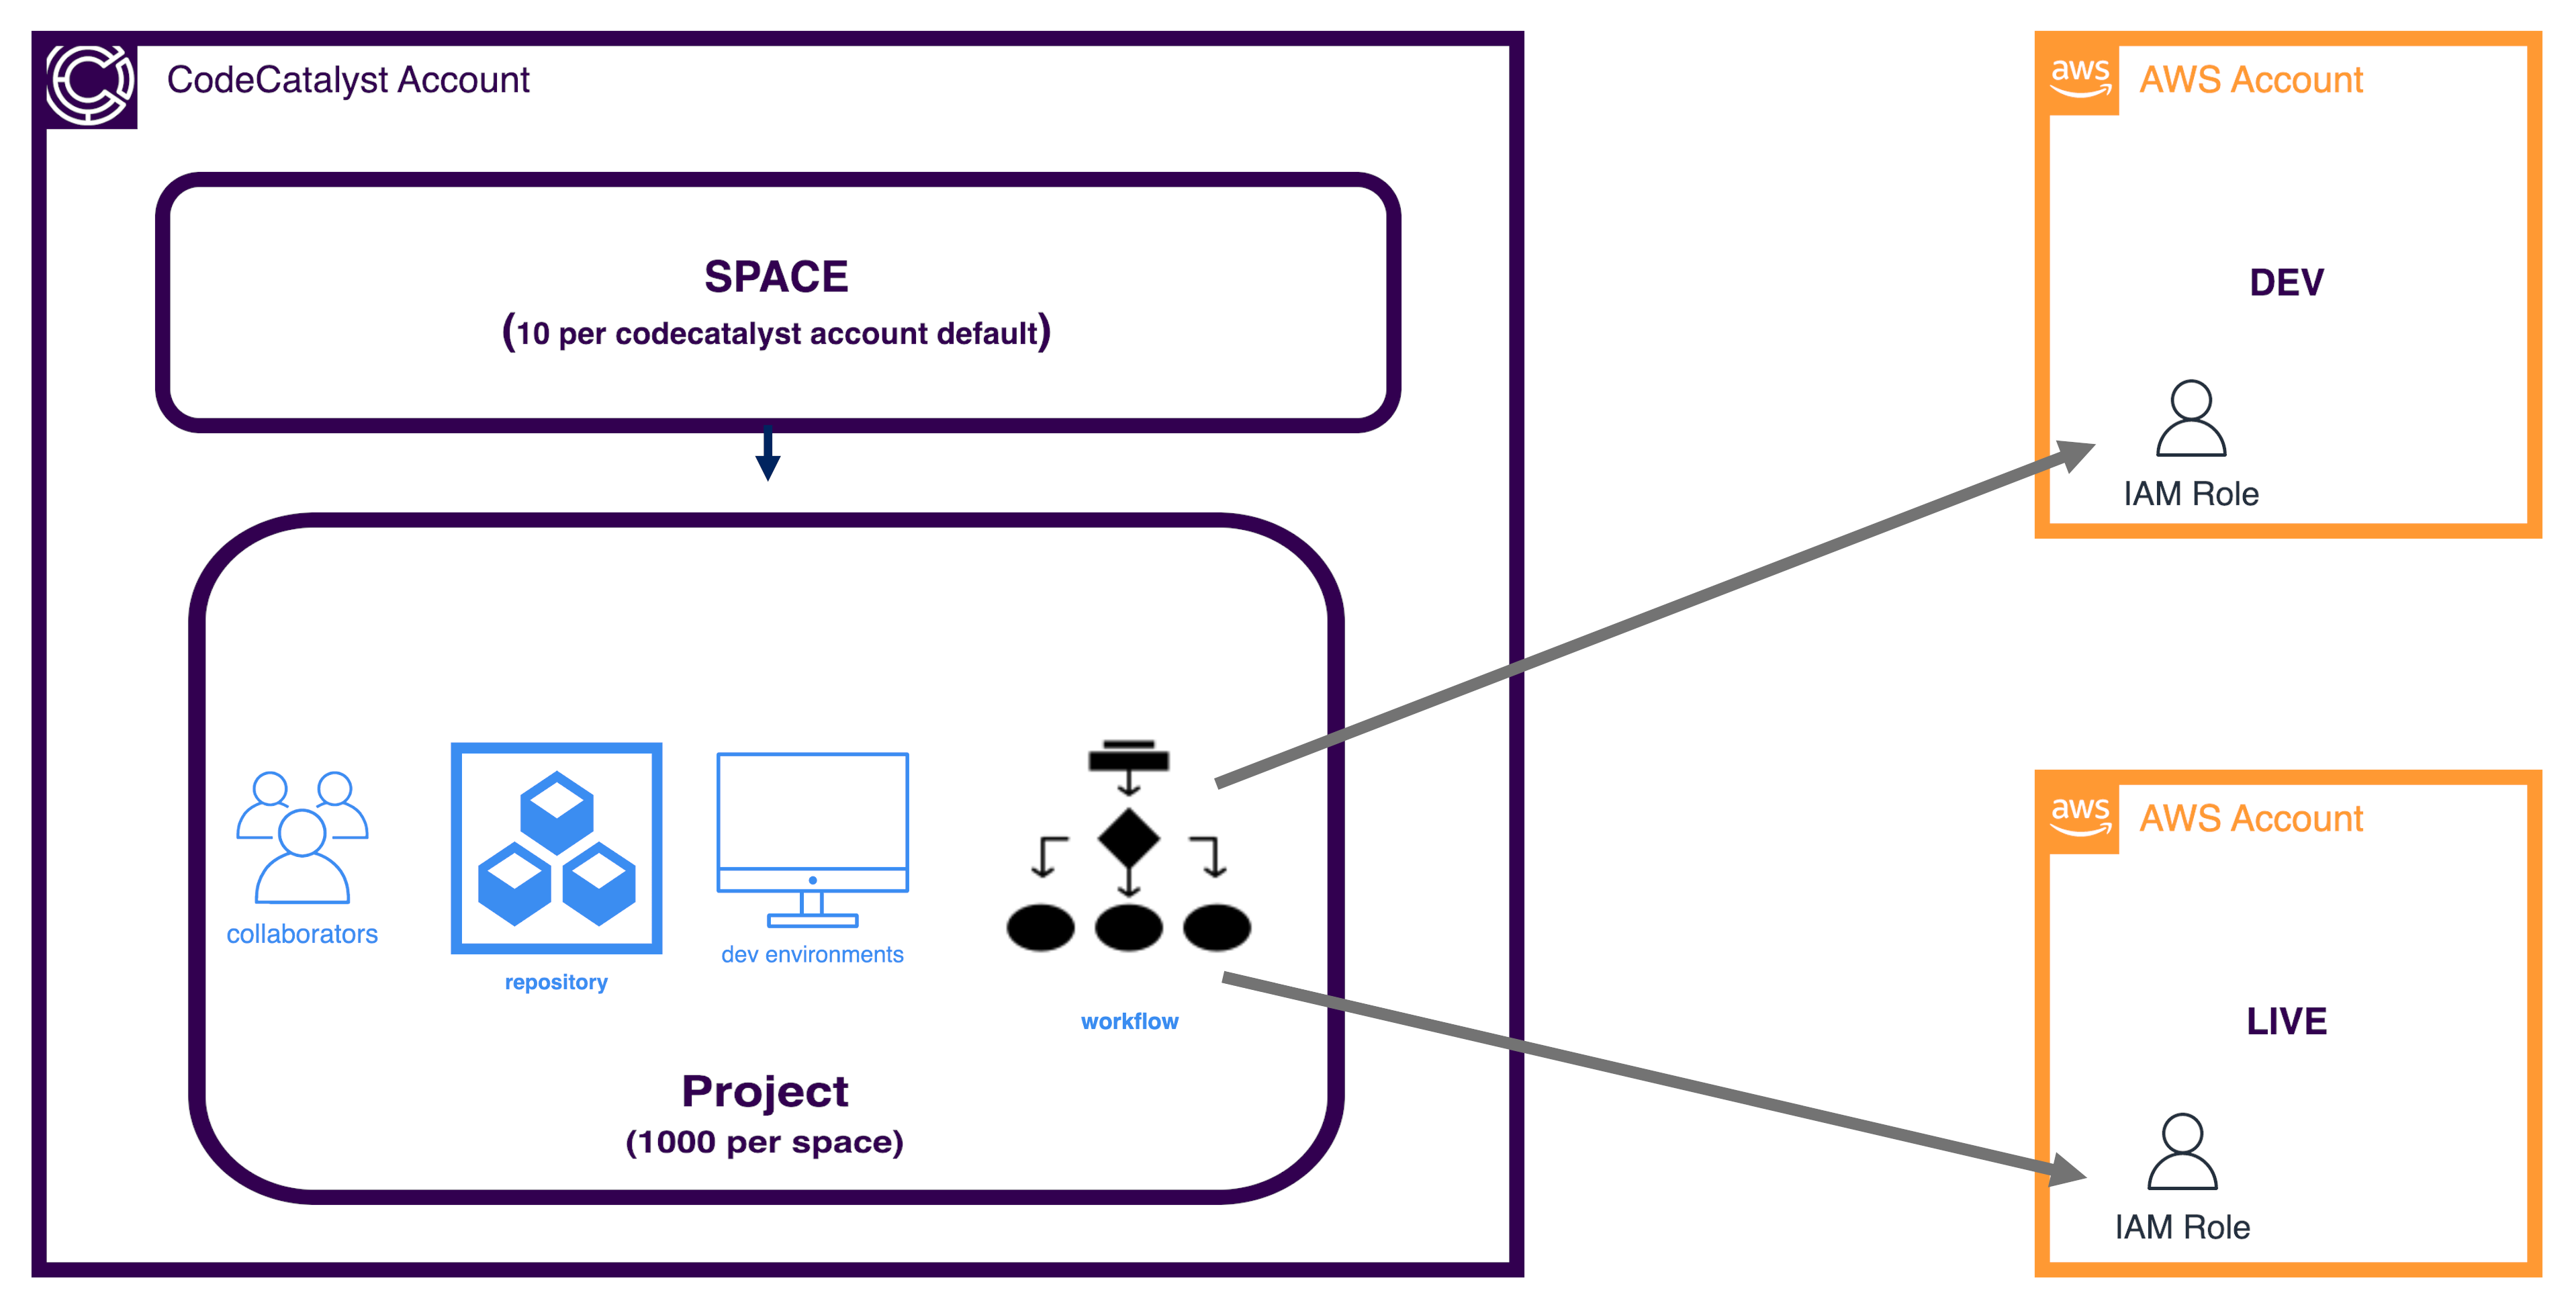
Amazon CodeCatalyst is a unified development platform announced at AWS re:Invent in November 2022. Amongst other things, it provides git repositories, virtual development environments, ci/cd pipelines and issue management (including integration with Jira.)
In use, CodeCatalyst sits in its own AWS Account. The top-level component is called a Space which can be considered as a way to group similar projects; for example, a website might contain HTML Code, Javascript, backend API’s etc. and all of these could be sensibly grouped within a space. For deployment into our own AWS accounts, CodeCatalyst assumes a specified IAM role with specified permissions via a ci/cd pipeline.
What is Hugo
Hugo is a static website generator that takes content written in Markdown format and uses it to generate a website. It’s become popular, along with other tools such as Jekyll, as an alternative to WordPress and other website platforms. Static website generators prepare their pages in advance, so there’s no need for a server to generate content dynamically which simplifies the hosting and has the important benefit of very quick loading times.
How do we deploy Hugo
Before we think about pipelines, we need to think about the steps we’ll need to deploy a Hugo website - it’s always a good idea to make sure we fully understand the manual process before we try to automate it.
As we make changes to our site or add content, we will typically need to go through the following steps:
- Generate the static pages - we do this by running the Hugo command which generates the appropriate content and places a copy of the generated files in the
publicfolder in the Hugo file hierarchy. - Copy the generated files to the hosting location - this is typically an S3 bucket
- Share data with any external platforms - for example, a lot of Hugo sites use a platform called Algolia to handle the search within the site.
- If we’re hosting in AWS, we’re probably using CloudFront. CloudFront acts as a cache to speed up delivery, so we need to tell CloudFront to clear the cache so we have the latest content.
Creating a pipeline in CodeCatalyst
CodeCatalyst calls its pipelines ‘workflows’. It provides 2 main methods to create and manage these workflows - either working through a UI which provides a visual or text-based interface to edit the workflow, or editing the workflow directly. The created workflows are stored in a folder called .codecatalyst/workflows within the repository associated with the project as yaml files. (tl;dr to see the complete )
I’ve put together the workflow shown below, which I use to deploy this blog as I make changes to the underlying code:
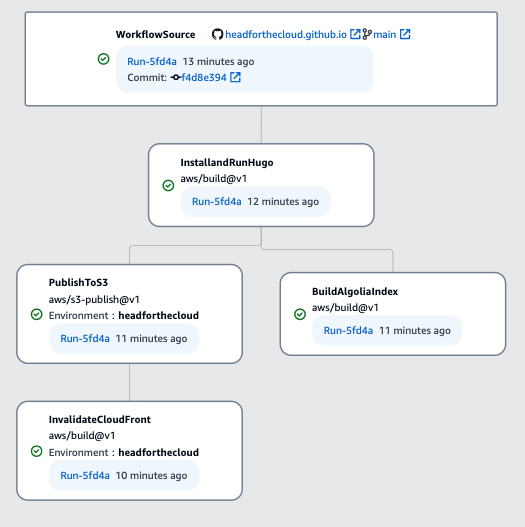
As you can see, the steps follow what I do manually as described in the previous section. The illustration also shows that all of the steps were completed successfully, as indicated by the green ticks. The diagram also shows that the workflow can perform tasks in parallel - once I’ve generated my content in the first action, I don’t need to wait to upload the content to S3 and then upload my index to Algolia, but I can run them in parallel. This can deliver reduced workflow execution windows.
What a workflow looks like:
Workflows are stored in a yaml file, so as you become more experienced working with them, it’s not necessary to use the UI which can increase the speed at which we can create the pipelines.
In this case, I’ve created a workflow called BuildHugoBlog which is defined by the following content:
Workflow Configuration
The first section of the workflow defines the name of the workflow and when it will be triggered:
1Name: BuildHugoBlog
2SchemaVersion: "1.0"
3
4# Optional - Set automatic triggers.
5Triggers:
6  - Type: Push
In this case, I want the workflow to run on a commit to any branch so I don’t define specific branches on the trigger, although this is simple to do. It’s also possible to configure the workflow so it can only be triggered manually by omitting the Triggers section.
Building the Hugo content
With an overall configuration for the workflow setup, its time to start creating the steps; in CodeCatalyst these steps are known as actions and are defined below:
 1Actions:
 2  InstallandRunHugo:
 3    Identifier: aws/build@v1
 4    Inputs:
 5      Sources:
 6        - WorkflowSource
 7    Outputs:
 8      AutoDiscoverReports:
 9        Enabled: false
10      Artifacts:
11        - Name: blogOutput
12          Files:
13            - public/**/*
14    Configuration:
15      Steps:
16        - Run: wget https://github.com/gohugoio/hugo/releases/download/v0.111.2/hugo_0.111.2_linux-amd64.tar.gz
17        - Run: tar xzvf hugo_0.111.2_linux-amd64.tar.gz
18        - Run: git submodule init
19        - Run: git submodule update
20        - Run: ./hugo
21    Compute:
22      Type: EC2
The code for the action above performs the following:
- Line 3 tells the action to use the
buildtype defined by AWS which is typically used to perform generic tasks. A full list of action types is available in the AWS documentation, and it’s also possible to use GitHub actions. - Lines 4-6 define the inputs provided to the action. In this case,
WorkflowSourcetells the action to use the repositories in the same project. - Lines 7-13 define the outputs this action will create. In this case, lines 8-9 tell the workflow there are no associated reports with this action; if we were running a step that created reports such as unit test outputs, these could be captured and made available for review. Lines 10-13 tell the action to create an artifact called
blogOutputusing all files and subfolders belowpublic. (As described above, Hugo places the content it generates under thepublicfolder.) - Lines 14-20 define the actions to perform for the pipeline. In this case, we’re
- Downloading the package for Hugo from its website,
- Extracting the package so we can run the executable
- Setting up any submodules in git
- Updating the submodules
- Running Hugo to generate content and place it in
public
- Lines 21-22 define the compute type used to execute the pipeline. At the moment, the only options are
EC2orLambda.In theOutputssection, we define an artifact containing the generated files underpublic. This is because each action is carried out in a separate compute environment, and the only resources available to each action automatically are the code from the associated git repository. To make generated content available across actions, we need to output it in the action where it’s generated as an artifact, then import it into actions that need it.
Publishing the content to S3
Once we’ve generated our static pages in the first step and stored them in the blogOutput artifact, we want to copy the content to the appropriate S3 bucket. Luckily, CodeCatalyst has an action specifically for this purpose as shown in line 2 below:
 1  PublishToS3:
 2    Identifier: aws/s3-publish@v1
 3    Environment:
 4      Connections:
 5        - Role: CodeCatalystPreviewDevelopmentAdministrator-5thw79
 6          Name: headforthecloud
 7      Name: headforthecloud
 8    Inputs:
 9      Artifacts:
10        - blogOutput
11    Compute:
12      Type: EC2
13    Configuration:
14      DestinationBucketName: headforthe.cloud
15      SourcePath: public
16    DependsOn:
17      - InstallandRunHugo
The publish action is configured as described below:
- Lines 3-7 defined how we’re going to interact with our AWS account, using what CodeCatalyst calls an environment where we link to an AWS account and create a role to control what permissions CodeCatalyst has in the AWS account.
- In lines 8-10, we import the artifact that we created in the first step and make the content available
- Lines 13-15 describe how to carry out our actual file copies. In this case, we want to copy files from
publicto the specified bucket. - Lines 16-17 tells the workflow that the previous step
InstallandRunHugomust have finished successfully before this step can run.
Telling Algolia about our content
As mentioned above, we use Algolia to manage our search functionality. To do this, step 1 generates a file called index.json which contains a list of all published pages, along with some metadata. We need to send this data to Algolia, so it can be used to generate our search results. We use the following action to perform this:
 1  BuildAlgoliaIndex:
 2    Identifier: aws/build@v1
 3    Inputs:
 4      Sources:
 5        - WorkflowSource
 6      Artifacts:
 7        - blogOutput
 8    Outputs:
 9      AutoDiscoverReports:
10        Enabled: false
11        ReportNamePrefix: rpt
12    Configuration:
13      Steps:
14        - Run: cd algolia
15        - Run: npm install
16        - Run: app_id=$(grep algolia_appId ../config.toml | cut -d\" -f2)
17        - Run: index_name=$(grep algolia_indexName ../config.toml | cut -d\" -f2)
18        - Run: npm run data-upload -- -f $CATALYST_SOURCE_DIR_blogOutput/public/index.json -a $app_id -k ${Secrets.AlgoliaAPIKey} -n $index_name
19    Compute:
20      Type: EC2
21    DependsOn:
22      - InstallandRunHugo
Again, we’re going to use the generic build action, and import the artifact we generated in the first step with our content.
The important section in this action is lines 12-18 where we:
- Lines 14-15 change into the
algoliafolder in our content and installs the required node.js packages - Lines 16 and 17 extract two values from our configuration file and stores them in environment variables
- Line 18 calls a node.js code to copy the file
index.jsonfrom the path that we know contains our imported public folder$CATALYST_SOURCE_DIR_blogOutput/public, using the environment variables and a secret stored in CodeCatalyst containing our authentication credentials. - Lines 21-22 specify that we need to wait for our first action to complete, but there’s no dependency on the publish action so we can run in parallel.
Clearing the CloudFront cache
As mentioned earlier, CloudFront uses a cache to improve content delivery times, but once we’ve updated content we need to empty this cache so users can see our latest content. This is done with following code, again using the build action.
 1  InvalidateCloudFront:
 2    Identifier: aws/build@v1
 3    Outputs:
 4      AutoDiscoverReports:
 5        Enabled: false
 6    Environment:
 7      Connections:
 8        - Role: CodeCatalystPreviewDevelopmentAdministrator-5thw79
 9          Name: headforthecloud
10      Name: headforthecloud
11    Inputs:
12      Sources:
13        - WorkflowSource
14    Configuration:
15      Steps:
16        - Run: dist=$(aws cloudfront list-distributions --query "DistributionList.Items[*].{id:Id,alias:Aliases.Items[0]}[?alias=='headforthe.cloud'].id" --output text)
17        - Run: if [ -z "$dist" ]; then echo "Cannot find cloudfront distribution for domain";false; fi
18        - Run: aws cloudfront create-invalidation --distribution-id $dist --paths '/*'
19    Compute:
20      Type: EC2
21    DependsOn:
22      - PublishToS3
Much of this is similar to previous actions, defining an AWS environment which we’ll interact with, and importing the artifact created in the first action.
We then run the steps listed in lines 14-18 to carry out the following actions:
- use the AWS CLI to query for a CloudFront distribution handling our domain
- check if a distribution was found, and if not, output an error message and set a false status to indicate a failure - this failure, causes the action to stop and indicate an error.
- If we have found a distribution, we tell the CloudFront distribution to clear down the cache, removing all files.
Monitoring the workflow
Whether we run the workflow manually to test during development, or it is invoked following a change to our repository, it can be useful to understand at a lower level what is happening for each step in the workflow.
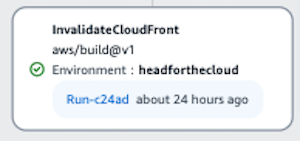
If we look at an individual action in the workflow in the CodeCatalyst console, it will tell us when it last ran and which run that was part of. It will also indicate whether it finished successfully with a green tick, or failed with a red cross.
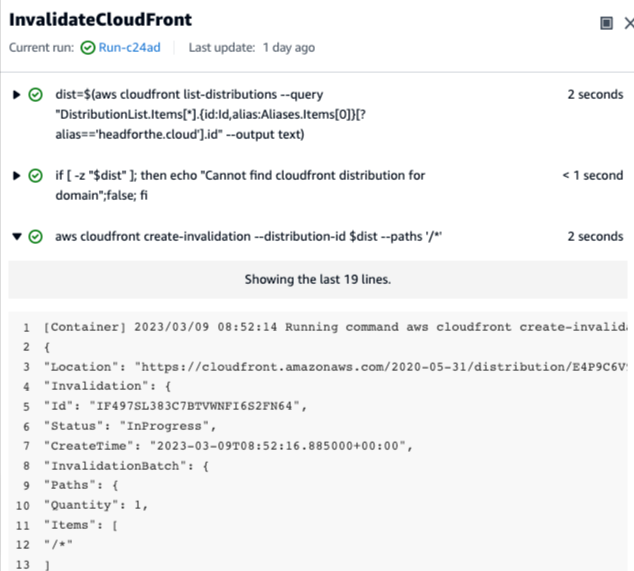
Clicking on the status to open, the console shows us in more detail the steps of the action, along with a status for each step
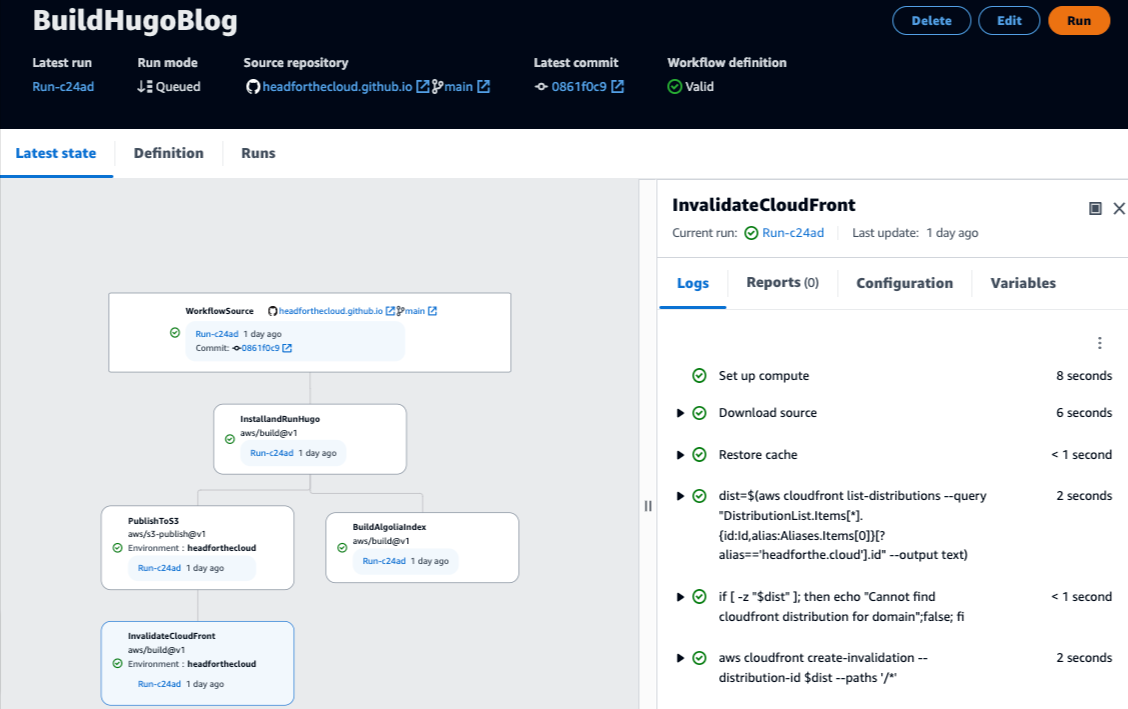
From this point, we can look at the output from an individual step if we need to investigate an issue. For example, if we open the step that invalidates the CloudFront cache, we can see that the AWS CLI call returns a status indicating that we made a successful request and that it was in progress.
Defining what actions CodeCatalyst can carry out in our AWS Account.
As mentioned above, we use a CodeCatalyst environment to connect with our AWS account. This environment includes an IAM role in our AWS account that CodeCatalyst creates during the process of allowing access. This includes several permissions to generally used services but doesn’t include permissions to work with CloudFront.
This means that we need to add an extra policy to the CodeCatalyst role in our account to provide these permissions. This means creating an additional policy as listed below:
{
    "Version": "2012-10-17",
    "Statement": [
        {
            "Sid": "VisualEditor0",
            "Effect": "Allow",
            "Action": [
                "cloudfront:ListDistributions",
                "cloudfront:CreateInvalidation"
            ],
            "Resource": "_insert_arn_of_cloudfront_distribution_"
        }
    ]
}
Conclusion
As mentioned CodeCatalyst is in preview, so changes are possible, but it’s already capable of handling workflows with several steps, including ones that run in parallel.
Simple projects like this should easily fall within the free tier, but please review the tier details at https://codecatalyst.aws/explore/pricing for your particular use-cases. For myself, I’m able to run this project without having to provision or pay for a SaaS solution, with the added benefit that it’s easy to integrate with our existing AWS accounts.
I’d definitely recommend anyone who uses ci/cd pipelines, or wants an integrated development experience investigate CodeCatalyst!