

Using AWS EventBridge to avoid getting Lost in Translation
Table of Contents
Don’t rewrite your code, rewrite your data with EventBridge Input Transformation!
Photo by Ben Blennerhassett on Unsplash
Event-Driven Architecture (EDA) has been a major theme for AWS over the last couple of months. EDA is a design pattern that lets us decouple dependencies in our code by allowing it to respond to events, rather than executing pre-defined steps. Typically with EDA, events are sent to a central hub or broker which then distributes them to appropriate services or components. In AWS, this broker is EventBridge which was launched in July 2019.
EventBridge is replacing other solutions in AWS, such as S3 Notifications, but when we change to EventBridge, the format of the data sent is likely to change which could potentially mean a rewrite of our application or component code.
However, in March 2022, new functionality was added to EventBridge which can take incoming data and transform it to a new format, which we can use to avoid code rewrites. This article will explain how we can do this.
Example Event Data
Before we look at how to rewrite data sent via EventBridge, it’s good to understand the types of data we might work with. To do this, let’s review everyone’s favourite example where we use events from S3 such as uploading data to trigger an event that we’ll process via a Lambda.
When handling events from S3, we have 3 main options to send events from S3 to our lambda as shown below:
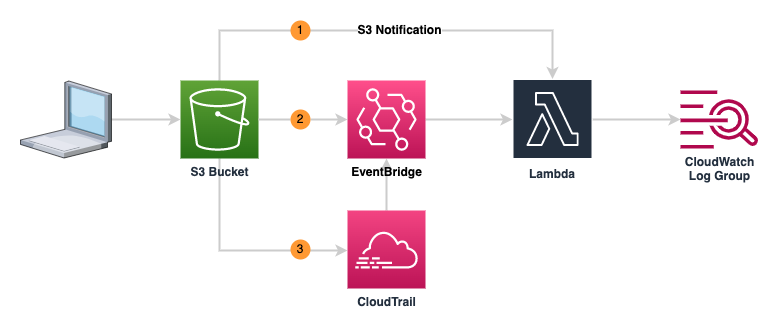
I’ve created a repository containing terraform which will deploy a lambda and set up the events as shown above. The lambda will output the event it receives, and will also generate an error if the event isn’t in the format expected for an S3 notification. The lambda will then output details to CloudWatch log groups sharing details of the event data, and an indication of whether the data matches the S3 notification format.
1. S3 Notifications
The original solution to send events from S3 buckets was S3 notifications. This would allow us, for example, to trigger a lambda or publish a message to an SNS queue, every time a file was uploaded to or deleted from an S3 bucket.
Events sent via S3 notifications are in a format that looks like
{
    "Records": [
        {
            "eventVersion": "2.1",
            "eventSource": "aws:s3",
            "awsRegion": "eu-west-1",
            "eventTime": "2023-04-17T17:16:41.318Z",
            "eventName": "ObjectCreated:Put",
            "userIdentity": {
                "principalId": "AWS:AROAT26SL6W6S3RJ2Y7OQ:dev@example.com"
            },
            "requestParameters": {
                "sourceIPAddress": "63.12.22.96"
            },
            "responseElements": {
                "x-amz-request-id": "SXYAPMN3SKB5595A",
                "x-amz-id-2": "dFuxi+hbdnTYL9j+pd0SRbz7VtrziQem3UGAOV8VKGUH0YbAvh7N8wpLcgHphlBP/mW4UyfLw/7+YYRoyq5XAY8LbhDfpklJ"
            },
            "s3": {
                "s3SchemaVersion": "1.0",
                "configurationId": "tf-s3-lambda-20230417162819538000000005",
                "bucket": {
                    "name": "123456789012-eu-west-1-dummy-bucket",
                    "ownerIdentity": {
                        "principalId": "A1C9A7AJA26WYL"
                    },
                    "arn": "arn:aws:s3:::123456789012-eu-west-1-dummy-bucket"
                },
                "object": {
                    "key": "uploadFile.csv",
                    "size": 7322,
                    "eTag": "9b4ce1bafe0178d652ad309ea385d1e3",
                    "sequencer": "00643D7EF948BD5687"
                }
            }
        }
    ]
}
This data includes:
eventName- what event occurred, in this case,ObjectCreated:Put, i.e. an object was uploaded to the bucket,s3.bucket.name- which bucket sent the event,s3.object.key- which object in the bucket was associated with the event,s3.object.size- how large was the object.
2. Event from S3 bucket to EventBridge
The second option to route events allows us to replace the notification on the S3 bucket, sending the event to EventBridge instead.
Data sent via this route looks like
{
    "version": "0",
    "id": "32dd3cdc-c1ae-ca08-5527-2037688c64fc",
    "detail-type": "Object Created",
    "source": "aws.s3",
    "account": "123456789012",
    "time": "2023-04-17T17:16:41Z",
    "region": "eu-west-1",
    "resources": [
        "arn:aws:s3:::123456789012-eu-west-1-dummy-bucket"
    ],
    "detail": {
        "version": "0",
        "bucket": {
            "name": "123456789012-eu-west-1-dummy-bucket"
        },
        "object": {
            "key": "uploadFile.csv",
            "size": 7322,
            "etag": "9b4ce1bafe0178d652ad309ea385d1e3",
            "sequencer": "00643D7EF948BD5687"
        },
        "request-id": "SXYAPMN3SKB5595A",
        "requester": "123456789012",
        "source-ip-address": "63.12.22.96",
        "reason": "PutObject"
    }
}
3. Event from CloudTrail to Eventbridge
The third option in this example is that rather than configuring an individual bucket to send events to EventBridge, we can capture them from CloudTrail. This gives us the advantage that we can process multiple buckets without having to configure them individually.
Data sent via this route contains significantly more information and looks like this:
{
    "version": "0",
    "id": "0ee116e9-edba-9c59-734a-5cfcd7a76300",
    "detail-type": "AWS API Call via CloudTrail",
    "source": "aws.s3",
    "account": "123456789012",
    "time": "2023-04-17T17:16:41Z",
    "region": "eu-west-1",
    "resources": [],
    "detail": {
        "eventVersion": "1.08",
        "userIdentity": {
            "type": "AssumedRole",
            "principalId": "AROAT26SL6W6S3RJ2Y7OQ:dev@example.com",
            "arn": "arn:aws:sts::123456789012:assumed-role/AWSReservedSSO_AWSAdministratorAccess_7c84571f56df82e2/dev@example.com",
            "accountId": "123456789012",
            "accessKeyId": "ASIAT26SL6W66QHOBPK5",
            "sessionContext": {
                "sessionIssuer": {
                    "type": "Role",
                    "principalId": "AROAT26SL6W6S3RJ2Y7OQ",
                    "arn": "arn:aws:iam::123456789012:role/aws-reserved/sso.amazonaws.com/eu-west-2/AWSReservedSSO_AWSAdministratorAccess_7c84571f56df82e2",
                    "accountId": "123456789012",
                    "userName": "AWSReservedSSO_AWSAdministratorAccess_7c84571f56df82e2"
                },
                "attributes": {
                    "creationDate": "2023-04-17T17:11:47Z",
                    "mfaAuthenticated": "false"
                }
            }
        },
        "eventTime": "2023-04-17T17:16:41Z",
        "eventSource": "s3.amazonaws.com",
        "eventName": "PutObject",
        "awsRegion": "eu-west-1",
        "sourceIPAddress": "63.12.22.96",
        "userAgent": "[Mozilla/5.0 (Macintosh; Intel Mac OS X 10_15_7) AppleWebKit/537.36 (KHTML, like Gecko) Chrome/112.0.0.0 Safari/537.36]",
        "requestParameters": {
            "X-Amz-Date": "20230417T171640Z",
            "bucketName": "123456789012-eu-west-1-dummy-bucket",
            "X-Amz-Algorithm": "AWS4-HMAC-SHA256",
            "x-amz-acl": "private",
            "X-Amz-SignedHeaders": "content-md5;content-type;host;x-amz-acl;x-amz-storage-class",
            "Host": "123456789012-eu-west-1-dummy-bucket.s3.eu-west-1.amazonaws.com",
            "X-Amz-Expires": "300",
            "key": "uploadFile.csv",
            "x-amz-storage-class": "STANDARD"
        },
        "responseElements": {
            "x-amz-server-side-encryption": "AES256"
        },
        "additionalEventData": {
            "SignatureVersion": "SigV4",
            "aclRequired": "Yes",
            "CipherSuite": "ECDHE-RSA-AES128-GCM-SHA256",
            "bytesTransferredIn": 7322,
            "SSEApplied": "Default_SSE_S3",
            "AuthenticationMethod": "QueryString",
            "x-amz-id-2": "I2jLcz7E9EKYZWn0VU/YfsXQ3GoicJpJuANaKTjmKePtyjdpC9eD3RPRpiigNJOddKk2ZJN7u1tNSW+VSUcxew==",
            "bytesTransferredOut": 0
        },
        "requestID": "SXYAPMN3SKB5595A",
        "eventID": "e0805ed7-b44f-48bd-aece-465f390607e7",
        "readOnly": false,
        "resources": [
            {
                "type": "AWS::S3::Object",
                "ARN": "arn:aws:s3:::123456789012-eu-west-1-dummy-bucket/uploadFile.csv"
            },
            {
                "accountId": "123456789012",
                "type": "AWS::S3::Bucket",
                "ARN": "arn:aws:s3:::123456789012-eu-west-1-dummy-bucket"
            }
        ],
        "eventType": "AwsApiCall",
        "managementEvent": false,
        "recipientAccountId": "123456789012",
        "eventCategory": "Data",
        "tlsDetails": {
            "tlsVersion": "TLSv1.2",
            "cipherSuite": "ECDHE-RSA-AES128-GCM-SHA256",
            "clientProvidedHostHeader": "123456789012-eu-west-1-dummy-bucket.s3.eu-west-1.amazonaws.com"
        }
    }
}
Transforming EventBridge data
Once we understand the format of the data being sent to EventBridge, we can use the input transformation functionality.
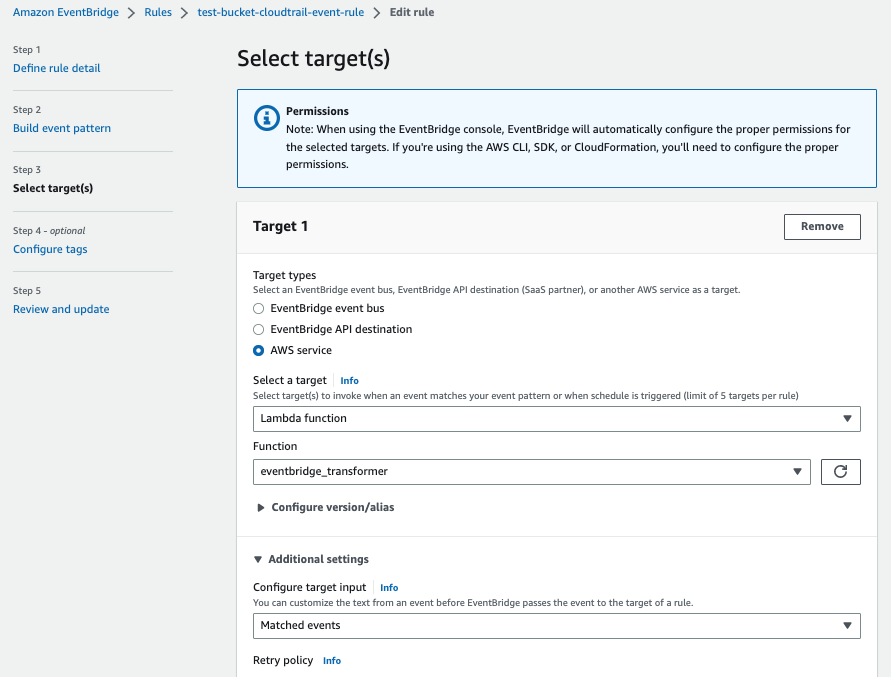
To do this, we need to tell EventBridge what fields to extract from the data, and then what format to send it in. We do this in the section of the EventBridge rule that defines where the event will be sent.
If you’d like to understand how to setup EventBridge rules, AWS have collected a set of tutorials covering various scenarios, but if you’ve deployed my example terraform to an AWS account, this will have created a rule called test-bucket-cloudtrail-event-rule that we can modify so that it sends data in a format matching an S3 notification. Select this rule, click the Edit button at the top of the form, and then select Step 3 - select target(s) to see the target configuration, which should look like
For this example, we going to assume our lambda only cares about the bucket and object names, so we’ll use the event sent by CloudTrail and use the transformer to reformat the output data in a truncated version of the S3 notification format as below
{
    "Records": [
        {
            "eventName": "ObjectCreated:Put",
            "s3": {
                "bucket": {
                    "name": "123456789012-eu-west-1-dummy-bucket",
                    "arn": "arn:aws:s3:::123456789012-eu-west-1-dummy-bucket"
                },
                "object": {
                    "key": "uploadFile.csv"
                }
            }
        }
    ]
}
If we look at the CloudTrail format from option 3 above, we can see that the bucket and object names are accessible through the detail.requestParameters segment of the data as below:
{
  ...

    "detail": {

  ...
        "requestParameters": {
            "X-Amz-Date": "20230417T171640Z",
            "bucketName": "123456789012-eu-west-1-dummy-bucket",
            "X-Amz-Algorithm": "AWS4-HMAC-SHA256",
            "x-amz-acl": "private",
            "X-Amz-SignedHeaders": "content-md5;content-type;host;x-amz-acl;x-amz-storage-class",
            "Host": "123456789012-eu-west-1-dummy-bucket.s3.eu-west-1.amazonaws.com",
            "X-Amz-Expires": "300",
            "key": "uploadFile.csv",
            "x-amz-storage-class": "STANDARD"
        },

  ...
    }
}
To set up the input transformation on the rule, we need to change the target input in additional settings to the option Input transformer and click on the Configure input transformer button. Scroll down to the Input path section in the Target input transformer and enter the following JSON:
{
  "bucketName":"$.detail.requestParameters.bucketName",
  "objectKey":"$.detail.requestParameters.key"
}
This creates two variables called bucketName and objectKey which will extract the required values from the CloudTrail data. We can then scroll down to the Template section and enter the following
{
    "Records": [
        {
            "eventName": "ObjectCreated:Put",
            "s3": {
                "bucket": {
                    "name": <bucketName>,
                    "arn": "arn:aws:s3:::<bucketName>"
                },
                "object": {
                    "key": <objectKey>
                }
            }
        }
    ]
}
If you review this example, you’ll see that we reference the variables we created by placing them in <>. We can either use the values directly as we do with the bucket name and object key, or we can embed them in a string as we do when we generate the bucket ARN.
Once we’ve done this, click Confirm at the bottom of the configuration screen, then Skip to Review and update. Review the changes we’ve made and make sure they match what we’ve described above, and finally click Update rule.
If we were to review the event data sent by EventBridge after uploading a file called dummy.txt to the S3 bucket 123456789012-eu-west-1-dummy-bucket, it will now look like
{
    "Records": [
        {
            "eventName": "ObjectCreated:Put",
            "s3": {
                "bucket": {
                    "name": "123456789012-eu-west-1-dummy-bucket",
                    "arn": "arn:aws:s3:::123456789012-eu-west-1-dummy-bucket"
                },
                "object": {
                    "key": "dummy.txt"
                }
            }
        }
    ]
}
which our original lambda can now process as it matches the expected format (albeit missing unused fields).
Pricing
The actual costs you incur will depend on your configuration, but if we look at the AWS pricing page for EventBridge, and we’re using opt-in services, we’ll be charged $1.00 per million processed events.